"There's a neat hack in Firefox and other Firefox-based browsers, which allows you to re-skin all Nitter instances with a light mode in one go. No cookies, no extensions, no dependency on specific instances."

We all love browsing and searching Twitter without having to submit to the platform's scourge of JavaScript and microtracking, right? Well, if you do, and you're already using Nitter for that purpose, I've got a quick and simple DIY hack which can help make Nitter look a little more inviting to fans of Twitter's default light mode.
WHAT IS NITTER?
Nitter is a decentralised front end for Twitter, which delivers all available logged-out Twitter content through a proxy, providing an escape from Twitter's increasingly oppressive monitoring tools.
In the past, Twitter was natively accessible via a clean and fast JavaScript-free interface, with very limited monitoring capability. This interface was known in more recent times as the Legacy Mobile environment. But in December 2020 Twitter shut down Legacy Mobile, leaving only JavaScript-dependent native options, which aggressively monitor the visitor's behaviour.
Since then, Nitter, with its standard HTML/CSS page composition, has become the obvious workaround to Twitter's enforcement of JavaScript-driven spy-tools.
USING NITTER
To use Nitter, you simply replace "twitter.com" in any Twitter URL with the name of a Nitter instance, and you get the same content without Twitter's ever-worsening behaviour-analysis, and without the need to accept any JavaScript at all. Like other federated proxies for Big Tech UGC silos, the Nitter instances are prone to outages, rate limitations and bugs. But by subbing in an alternative instance when a page fails, you can keep the adversities at bay.
BUT DO YOU WANT A DARK MODE DEFAULT?
The only potential issue I found with Nitter was its use of a dark theme as the default. Whether or not this is a problem would depend on personal taste, but if you're used to viewing Twitter in its default light mode, the Nitter default may strike you as a bit unwelcoming.
So what happens if you want to change the Nitter default for a light theme? It's not as simple a change as on Twitter, because you're often using multiple instances (which are completely separate websites with separate preference menus). And because of the privacy desires of the average Nitter user, there may also be a reluctance to accept preference cookies.
One or two Nitter instances do come with a light theme as their default, but that's only a small minority. And you can set each individual instance to a light mode in its Preferences menu, but that's time-consuming, and worse, it requires you to accept cookies. If you browse with cookies disabled, having to manually enable cookies for each individual Nitter instance would create another long-winded task. In yet another alternative, you could try using a browser extension to re-style the pages, but then you're bringing in a third party extension provider who may collect data.
Fortunately, there's a neat hack in Firefox and other Firefox-based browsers, which allows you to re-skin all Nitter instances with a light mode in one go. No cookies, no extensions, no dependency on specific instances. The method is fully DIY, and it involves using the browser's native CSS (stylesheet) customisation system to achieve a more Twitter-like Nitter without any hassle.
HOW TO BRIGHTEN UP NITTER, FAST...
If you're using Firefox itself and you've updated beyond Version 68, you first need to make a quick setting adjustment in about:config, because in V.69 Mozilla switched off CSS customisation in the defaults. Chromium used to have this feature too, but it's been removed altogether, so at least we can credit Mozilla with keeping it available.
PREPARATION FOR FIREFOX 69+
So, in Firefox 69 and subsequent versions…
Type about:config into Firefox's address bar.
Paste the line toolkit.legacyUserProfileCustomizations.stylesheets into the search box.
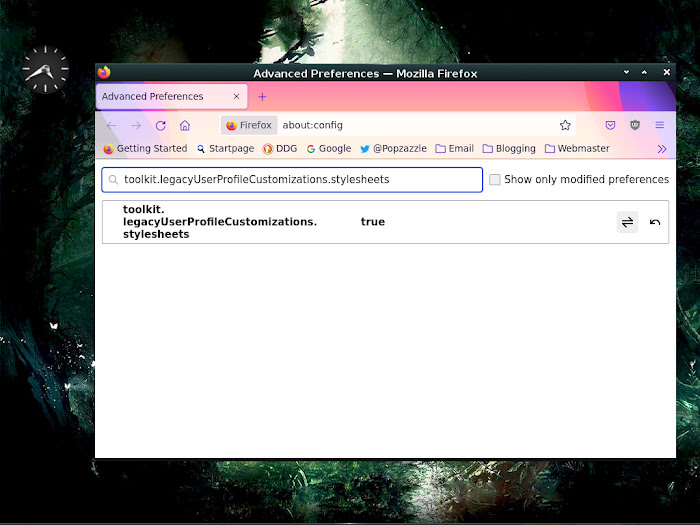
When the parameter appears on screen, change its setting from False to True , as you see above.
Stage 1 done.
In Firefox-based browsers forked from older versions - such as Pale Moon, Seamonkey and MyPal - you won't need to take the above action. They're set to use CSS customisations out of the box. The same goes for GNU Icecat, which was following the current Firefox in terms of features, but whose most recent version predates the Mozilla change. I'm using GNU Icecat in the example below…
SETTING UP YOUR LIGHT MODE FOR ALL OF NITTER
Now type about:profiles into the address bar of your Firefox or Firefox-based browser. You'll see this page…
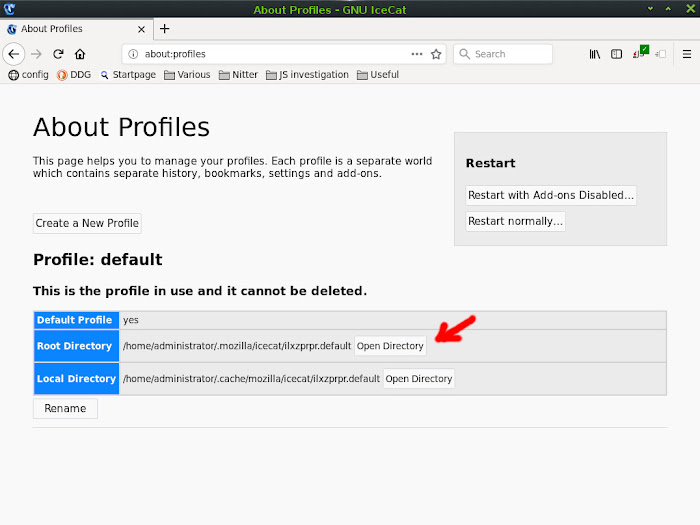
Hit the button that says Open Directory, in the Root Directory category of the profile that is in use. The browser will tell you which profile is in use.
Hitting the Open Directory button will open a folder on your drive. Look in the newly-opened folder for an immediate subfolder called chrome. If you don't see the chrome subfolder, create it - all letters in lowercase.
Now open the chrome subfolder and see if it contains a file called userContent.css. If it doesn't, create the file empty, with the case of the filename exactly as it appears here.
Finally, open userContent.css in your basic text editor, then copy the code below, and paste it into your userContent.css file. Then save the file. If the file already existed and contains text, paste the new code above everything else. That way, if there's any important existing code in the file, that code's functionality will not be overridden by the new code you're pasting in. Make sure you copy the whole of this code block…
body {--bg_color:#ffffff!important;--fg_color:#444444!important;--fg_faded:#6e6e6e!important;--fg_dark:#858585!important;--fg_nav:#0088ff!important;--bg_panel:#ffffff!important;--bg_elements:#fafafa!important;--bg_overlays:#252935!important;--bg_hover:#f8f9f9!important;--grey:#888889!important;--dark_grey:#cccccc!important;--darker_grey:#bbbbbb!important;--darkest_grey:#afafaf!important;--border_grey:#d6d6d6!important;--accent:#0088ff!important;--accent_light:#0088ff!important;--accent_dark:#99ccff!important;--accent_border:#858585!important;--play_button:#D8574D!important;--play_button_hover:#0088ff!important;--more_replies_dots:#AD433B!important;--error_red:#ff0000!important;--verified_blue:#1DA1F2!important;--icon_text:#656565!important;--tab:#646464!important;--tab_selected:#0088ff!important;--profile_stat:#000000!important;}.profile-card-avatar img {border:none !important;border-radius:50% !important;}@media (max-width: 720px){.profile-card-info{display:flex!important;}.profile-card-tabs-name{overflow:hidden!important;overflow-wrap:break-word!important;}.profile-card-avatar {height:60px!important;width:unset!important;}.profile-card-avatar img {border-width:0px!important;width:unset!important;}}.profile-tabs {max-width: 1500px!important;margin:0 auto!important;float:none!important;border-radius:0!important;position:relative!important;width: auto!important;}.profile-tabs .timeline-container{float: right!important;width:68%;}.profile-tabs .timeline{max-width:650px!important;float:left!important;margin-left:10px!important;margin-right:3%!important;}.profile-tab{padding: 0 4px 0 0;box-sizing: border-box;display:inline-block;font-size:13px; text-align:left;vertical-align:top;width:32%;width:unset;top:50px;line-height:1.3;}.profile-card, .photo-rail-card {max-width:250px!important;float:right!important;margin-right:10px!important;}@media (max-width: 720px){.photo-rail-card {display:none!important;}.profile-tabs {width: 100%!important;}.profile-tabs .timeline-container {width: 96% !important; margin:0 auto!important;float:none!important;}.profile-tabs .timeline-container .tab-item wide {flex-grow: 1.4;}.profile-tabs .timeline {max-width:100%!important;float:left!important;margin-left:0px!important;margin-right:0px!important;}.profile-tab {float:none!important;margin:0 auto!important;width: 94%!important;max-width: 96% !important;position:initial !important;padding: 0;}.profile-card {max-width:100%!important;float:none!important;margin: 0 auto!important;}}.tweet-content {font-size:16px!important;line-height:1.4!important;}.main-tweet .tweet-content { font-size: 18px!important; }.show-more{background-color: #ffffff !important;color:#ffffff !important;}.show-more a {background-color: #0088ff !important;color:#ffffff !important;border-radius:4px !important;}.show-more a:hover {opacity:0.6!important;text-decoration:none;}.profile-card {font-size:16px!important;}.site-name {color:#b2ff00 !important;}.icon-search {color:#dfdfdf !important;}.icon-cog {color:#b2ff00 !important;}.icon-info {color:#ff0088 !important;}.icon-bird {color:#00adff !important;}.icon-rss-feed {color:#ff5c00 !important;}.verified-icon{color:#ffffff!important;}Saved the file?… Now hop onto Nitter and enjoy the bright new look.
CSS CLASS CLASHES
Because the CSS classes used by Nitter may also be coincidentally used by other sites you visit, it's feasible that the code in your custom CSS file may alter the look of some other sites. For me, any occurences of this are rare, but if any significant problem does arise on other sites, you could solve it by downloading a separate, Firefox-based browser and dedicating that to Nitter plus a few other applications. For effective obfuscation of your online movements, it's always good to spread your browsing activity across a multitude of browsers anyway.
You can also easily disable the styling modification by going back into the chrome folder as previously discussed, and simply renaming the userContent.css file as notuserContent.css.